What's Aneeta reviewing?
Coco dress pattern by Tilly and the Buttons
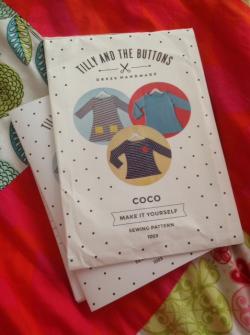
I really liked this pattern from the first minute I saw it. It somehow managed to be cute and stylish – two things that don’t usually come in the same package. But why was I surprised? As a Tilly and the Buttons design, cute and stylish seems to be part of her brand. In fact, when the pattern arrived, I thought I should frame it as the pattern envelope and instructions booklet were so beautifully designed that they were almost works of art and would certainly look amazing in a frame on my craft room wall.
There were a couple of things that troubled me about this pattern. First of all, I am a very new and inexperienced sewer. I’ve taken a couple of courses at Morley College (see skirt and many shirts on What’s Aneeta Not Knitting), and I’ve taken two classes and many twitter Q&As with The Thrifty Stitcher. Apart from that I work via trial and error, head-scratching, and hiding mistakes in the back of the closet.
Secondly, I’ve never worked with stretch fabric. My sewing machine balks at anything that isn’t plain cotton and I’m usually too scared of it to try anything new!
Thirdly, whilst I loved the look of Coco on Tilly herself, the dress seemed to me to be suited to a very slim and petite figure type. As a curvy-licious lady, I think that large swathes of stretch fabric will only make my boobs look lumpy and my lumps look like many spare tyres. SCARY! I usually wear cotton dresses that skim my figure and don’t cling anywhere they have no business clinging to. I knew that would be a concern if I wanted to make this dress.
And wanted to make it I did! I figured my best bet would be camouflage. Not army green camo…I mean a stretch fabric in a busy pattern or print that would distract from the clingy silhouette (and from my novice sewing skills). I’ve been searching online and in shops for a while but have found nothing to tempt me. I didn’t want to spend a lot of money as I knew that my skills might ruin any fancy fabric and I didn’t want to waste my pennies.
Yesterday, I pedalled over to Watney Market on the grim and gritty Commercial Road in East London (not to be confused with hipster Commercial Street). It’s an area full of Asian restaurants, wholesale outlets and the delightful Watney Market. I’ve loved this place for years with its very uncool Iceland and a proper little library (don’t even get me started on how much I dislike shiny Ideas Stores). All I wanted was a length of elastic for the waistband of the pyjamas I was sewing but like most crafters, of course I couldn’t resist a snoop into the fabric stall.
I found this unusual knit fabric – white knit backing and black, stretch lace ‘upper’ fabric, quilted (I don’t quite know how else to describe it) together with a black swirly stitch that can’t be seen from the top. I couldn’t quite decide if it was gorgeous or hideous but…hold onto your seats now…it was only £1 a metre! 100 measly pennies a metre! Even a scared stitcher like me can’t be afraid of ruining that…so I snapped up 3 metres of fabric after a chat with the stall holder about the promise of a stylish and ever so inexpensive new dress. (Note to self, I must pop back to the stall next week wearing my Coco to show off the fabric to the lady on the stall).
I decided as further distraction from the extra half a stone I carry on my hips (I’m probably being kind to myself with that amount) I would make the funnel neck and ¾ cuffed sleeves. I usually prefer a low necked dress…well if you’ve got a decent rack you may as well show it off, but I didn’t want to experiment with this style as well as with as with new stretchy fabric so I decided to stick with the pattern (which by the way comes in so many variations it’s hard to not find one to suit you!)

I graded the pattern from a 4 at the bust to 6 at the waist and 7 at the hips. I extended the length by a couple of inches to give myself hemming options. Then I traced the pattern to save the original (which is so nice and sturdy it’s a dream to trace from). As suggested in the pattern I pinned it and tried it on before properly sewing it together at the sides. And it fitted gorgeously first time! The ease in the pattern is enough for it to feel fitted at the top and nice and swingy at the bottom. Fitting is my bête noir of sewing as (I’ve learnt) I’m a 12 with a small back and a full bust. But the good thing about stretch fabric is that it works with curves in a different way to non-stretchy fabric and this seems to make it cling nicely in all the right places.
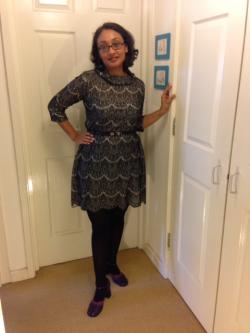
I think it also looks great with a belt!
I had to shorten the sleeves by about 3 inches as I wanted cuffs that weren’t folded back. I thought the fabric might be too bulky for that.
One thing I did differently was line up the centre of the funnel neck with the centre back and not the shoulder seam. It helps me see easily which is the front and back of the dress when I put it on. The funnel neck doesn't stand up as I think my fabric is too floopy (word invented by Claudia Winkleman on GBSB), but it looks good draped to the front.
I sewed some of it on the overlocker but preferred using a zig zag stitch on the regular sewing machine as that was less bulky on the seams.
It took me around an hour to grade and trace the pattern and cut out the pieces (there are so few of them!) and about 3 hours to sew the dress up. It’s definitely the quickest thing I’ve made in ages.
Then…at a complete risk of ruining the dress at the final hurdle, I thought I’d have a go at following the pattern of the fabric and scalloping the hem! I did a few experimental practices first and decided the best way was to top stitch a zig zag then cut the fabric below that. And it worked! I admit that the excellent pattern matching at the hemline was a complete fluke. I don’t want to take any credit away from Lady Luck for that!
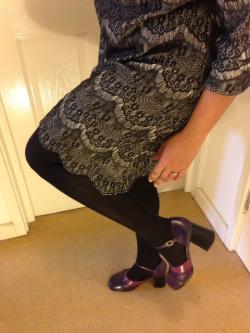
I don’t know how long this dress will last. The fabric seems quite fragile and I definitely don’t think it would survive even the shortest bicycle ride, but for now, I’ll wear it happily and in good health and drink a toast to Tilly’s lovely and easy to use pattern and my bravery in having a go at something new!
Review of sewing classes
I’m a self-confessed nervous sewer. It’s almost as if all the confidence I have in my knitting vanishes when faced with fabric and a sewing pattern. But that doesn’t mean the desire isn’t there. From the doll’s clothes I hand stitched as a child to self-made patterns using existing shift dresses, I’ve been a have-a-go sewer for many years. That’s suited me fine until a couple of years ago when I realised how much more I could make if I understood commercial sewing patterns and (insert music of doom) the dreaded ‘fitting’ side of sewing.
Morley College
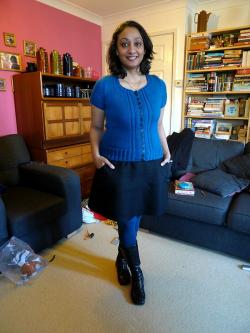
I started with a term of Sew a Skirt, a basic sewing class at Morley College in Lambeth. This was the first time for me to use a commercial sewing pattern and to make a toile. I loved this class! And I couldn’t get enough of learning new sewing skills. The teacher was very friendly and knowledgeable, but the other students were less than inspiring. By the last session there were only 4 of us remaining. I guess the downside of an inexpensive course is that students might not value it as highly as a more expensive, intensive class (such as can be found at craft shops and workshops). But that aside, it didn’t put me off learning to sew and my skirt was a delight of perfect fit and lots of new skills. Here I am modelling it with my newly knitted cardigan.
Then I talked my way into a term of intermediate sewing – Sew a Shirt. This course attracted a much more dedicated student and there were rarely less than a dozen of interested and interesting students in each session. This of course meant that the teacher had a lot to get through and helping each of us individually meant a lot of waiting around. But I thought that was to be expected as the hourly fee of the class worked out at around a fiver per hour. I know that I could have easily paid four times that in a craft store to be able to work more intensively, so it’s swings and roundabouts between how much you want to pay and how much time you want to give to learning. Certainly the teacher was excellent, usefully pernickety about accuracy, with an enormously wealth of sewing knowledge.
It took me a term and a half…which resulted in many many shirts! This is a skill that I love having and it’s also given me lots more confidence in my sewing skills.
.img_assist_custom.jpg)
The Thrifty Stitcher
I decided to give this class a go as it was specifically about pattern fitting. I can muddle through putting something together and the internet is a great help with photo and video tutorials on techniques, but I still know very little about how to make a garment FIT.
In this three hour class we learnt several different techniques on how to measure oneself and how to transfer these measurements onto a commercial sewing pattern. NEWSFLASH: did you know that women’s dress patterns are only written for a B cup?! As a curvy lady sporting the rather unusual size of 32E, this means that I am a size 12 with a small back and a full bust. How amazing to know that, let alone to learn how to superimpose my own 3D measurements onto a flat paper pattern.
CL (AKA The Thrifty Stitcher and sewing producer of The Great British Sewing Bee) is a warm and friendly teacher with years of professional and personal experience as a seamstress. She answered my endless sewing questions not only in the class but via twitter and email! Since taking a couple of fitting classes with her I have made 4 dresses for myself! Each fits a little better than the one before as she’s given me the skills (I still have sooo much to learn) and confidence to be able to tweak patterns to my personal shape.

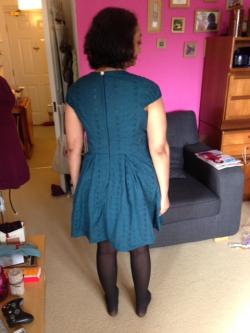
MORE PHOTOS OF NEW DRESSES COMING SOON!
I am completely enthused by my sewing and couldn’t have gotten this far without the classes I have taken. Books and the internet are great, but as a crafting teacher and learner, I know that there’s no replacement for an actual knowledgeable human being with you to guide you in new skills and ideas. I’d recommend taking a class to all potential crafters!
Knitted Toy Tales by Laura Long
I very rarely recommend a book based on how the patterns are written; as a knitting teacher I’m regularly confronted by wailing knitters complaining that patterns they find are written in Martian. A failing of many knitting patterns is that they are so often written in a traditional format which assumes that we live in the same knitting culture as our grandmothers (and before) did. We. Do. Not!
Knitters these days are mostly approaching knitting as something completely new that they may or may not have attempted in primary school and definitely didn’t not learn as a matter of course from their mothers. Therefore patterns need to be written for a modern audience, with full explanations, and no ‘reverse shapings’ (my personal knitting teacher’s bête noir; there’s nothing that will baffle a new knitter more than having to do that)!
This isn’t much, but it takes more effort on the part of the pattern writer and more paper in the books!
Knitted Toy Tales by Laura Long is a charming knitting book that combines style and substance. The patterns are written out fully in a way that leaves no need for confusion to a less-experienced knitter. It’s simply a matter of making a photocopy of the pattern you are working on and ticking off the rows as you knit them. Magically straight-forward and a delight to anyone who teaches knitting! I recommend this book to lots of my Knitting SOS students who want to knit toys!
To add to this solid substance is the style that comes with the designs and stories that Laura has written about each little character. She’s brought to life the dreams of Frederick the Frog, Three Hungry Bears and, my personal favourite, Eddie the Elephant.
One little suggestion that I might make…the toys turn out quite large, and are knitted using the technically correct needle size for the yarn. When I knit toys I always use a needle 1mm smaller than the yarn recommends. This means that your toy has a tighter weave and the stuffing won’t show through the fabric when you push it in. This is just a personal preference: when I knit toys with double knit yarn I’ll use a 3mm needle, 4mm needle with aran weight yarn, and so on.
I thoroughly recommend this book. As it says, they are definitely ‘irresistible characters for all ages.’
.img_assist_custom.jpg)
The Knit Kit
The Knit Kit has been coined by the industry as "The Swiss Army" tool for Knitters…an ambitious tagline that I totally agree with! I rarely leave the flat without mine as it’s useful for all sorts of crafting emergencies. When it comes to taking some knitting on holiday or out to an event, The Knit Kit is the first thing I pack.
It comes with:
· Folding scissors (that are acceptable on flights).
· A double sided crochet hook for different weights of yarn.
· A darning needle.
· Markers.
· Needle stops to prevent losing your stitches in transit.
· A tape measure.
· A needle gauge.
· A row counter.
And it’s all in a handy little case that’s perfect for your knitting bag or even handbag! A genius tool for all knitters.
.img_assist_custom.jpg)
Pure Luxury Merino by Stylecraft
There are many on-trend yarn companies out there and I don’t necessarily think that Stylecraft is one of them. This made me even more keen to point out that expensive doesn’t always mean the ‘best’. Stylecraft have a wide range of yarns that range from basic acrylics to interesting mixed fibres to pure wools.
I don’t often knit with pure wool because I find that ‘fancier’ yarns can have a tendency to be less hard wearing and potentially more bobbly. However Pure Luxury Merino does what is says on the label and is still a great quality yarn in terms of durability. I for one DO NOT want to spend hours, weeks and months knitting something that bobbles or doesn’t wash easily.
This yarn is machine washable which means that the garment doesn’t need to be kept for a special occasion and is so soft and smooth that it knits up absolutely beautifully. I knitted a tank top for my notoriously fussy (…ew it’s itchy!) other half and he wears in a blissful mixture of comfort and style. This makes me very happy! A lovely yarn to knit with, durable, and a price that won’t break the bank.
.img_assist_custom.jpg)
Susan Bates Crystalite Needles
I have to admit that the first pair of Susan Bates Crystalite needles I bought were because of the pretty colour. But I was quickly impressed by the smooth, light-weight needles that weren’t so long as to be unwieldy, and not so short as to not be practical.
If you’re looking for a set of straight needles for your knitting bag that are a bit more showbiz to look at but still practical to use then I definitely recommend a set of Susan Bates Crystalites. They give me an extra sense of pleasure and satisfaction whenever I use them. Remember that it’s great to knit amazing things, but knitting is so much more about the journey than the destination. These colourful needles add such warmth to that knitting-journey!
.img_assist_custom.jpg)
KnitPro Needles
Knit Two Together by Mel Clark and Tracy Ullman
Katia Gatsby
I always covet sparkly yarns…the blinger the better (if blinger is a word). But what has stopped me knitting a sparkly garment in the past is that the yarn is either fluffy (I suffer with hayfever at the first sign of ‘something’ floating in the air) or scratchy. Having uber-sensitive skin, eyes and nasal passages is a bit of a pain for a knitter and is always a factor in what I knit.
I first saw Katia Gatsby yarn when a knitter brought a ball along to Knitting SOS’s knitting group. As soon as I felt how soft it was I immediately had to go on a hunt for some! It was hard to find, but when I did I knew I had to have it. I don’t buy a great deal of yarn as my stash is the size of Kilimanjaro, but I made an exception for this.
The result is a 4-ply, short sleeved cardigan with cable twist detail. It’s still a bit of a work in progress as I need to think about the front fastening, but I’ve already worn it and delighted in the sparkle. I’m one happy knitter!
.img_assist_custom.jpg)
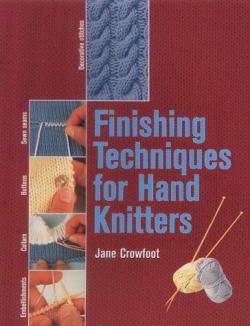
Finishing Techniques for Handknitters by Jane Crowfoot
I've seen a LOT of knitting books and this is one of the few that (as a professional knitting teacher) I am happy to recommend. It's not cool and trendy and the patterns are definitely dated, but to learn essential and timeless techniques for giving your knitting a neat and professional finish it is one of the best books out there.
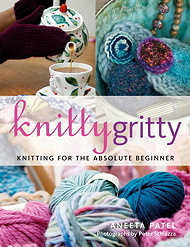
If you're looking for a book for a complete beginner, this might seem too advanced, but use it alongside my book Knitty Gritty: Knitting for the Absolute Beginner and you'll soon be knitting up garments and gifts that anyone would be pleased to wear or receive as a gift. Even after knitting for over 30 years, I still use this book regularly to brush up on essential techniques. Thank you Jane Crowfoot!